Version 1.x users: You need OL Monitor version 1.9.3c or above to use this feature.
Version 2.x users: You need OL Monitor version 2.1.5a or above to use this feature.
To help with challenges connecting to newly configured servers that have additional prompts, we have added handling to the macro for a second user-defined custom prompt and reply. Space is limited in the OL Monitor configuration screen, so for now using the new feature will require manually editing the .INI file. This article explains how to insert and edit 2 new items into your .INI file.
Note: This article presumes you are familiar with and are using the first custom prompt and reply feature. More info on that feature here:
Step 1:
Open OL Monitor and go into options. In settings location options, select INI file if it is not already selected. Click OK.
From the main OL Monitor screen select Help-Locate OLProcessLog. Click OK on the info box that pops up and close OL Monitor.
Step 2:
A Windows File Explorer window will have launched. In the folder locate the OLMon.INI file and double click to edit in Notepad.
You will see all your settings listed.
Locate the setting named “UserPrompt0” (without quotes)
near it you should also see a setting named “UserReply0”.
We will use these as a template to create 2 similar entries.
Copy the 2 lines and paste a copy of them below. Change the new settings to read ” UserPrompt1″ and “UserReply1”.
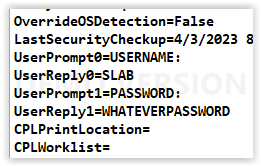
After the = signs on each setting name is the setting value. Edit the values to handle the additional Sunquest server prompts. See example screenshot below:
UserPrompt1=”PASSWORD:”
UserReply1=”WHATEVERPASSWORD”
Note: Be sure the UserPrompt1 matches exactly as the prompt is appearing in Sunquest.
Save and close the file.
Note: This article presumes you are familiar with and are using the first custom prompt and reply feature. More info on that feature here:
Misc tab in Online Manual
http://olmonitorblog.azurewebsites.net/?s=custom
Step 1:
Open OL Monitor and go into options. In settings location options, select .INI file if it is not already selected. Click OK.
From the main OL Monitor screen select Help-Locate OLProcessLog. Click OK on the info box that pops up and close OL Monitor.
Step 2:
A Windows File Explorer window will have launched. In the folder locate the OLMon.INI file and double click to edit in Notepad.
You will see all your settings listed.
Locate the setting named “UserPrompt0” (without quotes).
Near it you should also see a setting named “UserReply0”.
We will use these as a template to create 2 similar entries.
Copy the 2 lines and paste a copy of them below. Change the new settings to read “UserPrompt1” and “UserReply1”.
After the = signs on each setting name is the setting value. Edit the values to handle the additional Sunquest server prompts. See example screenshot below:
Note: Be sure the UserPrompt1 matches exactly as the prompt is appearing in Sunquest.
Save and close the file.
Step 3:
Now you can restart OL Monitor.
When Smarterm launches, click on the Smarterm window to keep it in the foreground.
As the macro launches, it reports its status on the Smarterm terminal window.
During the initial login process, in the upper right corner you should see the values of your first and second custom user prompt/reply combos displayed briefly. (The actual reply value for the second combo is hidden. )
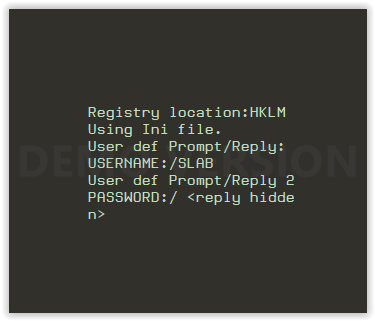
At the same time you can see if the macro is now able to get past the new prompts and login to Sunquest.
If you get login errors, make sure your custom prompts match exactly as they appear on the Sunquest screen, and that the replies you have defined are correct.
