Ol Monitor OverSeer

Previously only mentioned in the Spring 2013 newsletter, OverSeer takes more of a hammer approach to OL Monitors having issues.  Recently (OverSeer versions 1.0.5 and above) OverSeer has been refactored and a number of issues fixed.  OverSeer can be useful if you have an OL Monitor that crashes occasionally and just needs a restart.  Although it’s best to get with the programmer and solve the issue, OverSeer can keep the lights on in the meantime.  In addition OverSeer can send OlProcessLog debug files and diagnostic information automatically thus saving you time and effort during troubleshooting.

Features:

  • Monitors Ol Monitor.  Several items are watched to determine whether Ol Monitor has frozen or just isn’t working.
  • If Ol Monitor continues to appear stuck, it can shut it down and restart it and, if you enable the option, email a status report.
  • Checks for it’s own updates, and also checks for Ol Monitor updates.  If you choose to update Ol Monitor it launches the updater for you.
  • Keeps out of the way, minimizes to the system tray, and any message boxes that pop up will close themselves after 10 seconds or so.
  • If you are having trouble getting the OlProcessLog.txt file to me you can click the ‘Email Now’ button and it will encrypt and attempt to send the file.

In the grid you can see 5 items that can be monitored.
The Status column is a quick indicator of whether the item has recent activity.
When you start OverSeer do not be alarmed if you see red in the Status column.  Give it a minute to do it’s checks.  OverSeer does it’s best to stay low-key and not do too many things at once.

At this point all OverSeer isn’t going to do anything.  If you want it to monitor one of the items you must enable them.
Click on any item to see it’s settings.  (I suggest OlMonitorLive to start):

Take action: This means that the item will be restarted if applicable.   So if OlMonitor stops updating (freezes, crashes, etc.), OverSeer will attempt to close and restart it.
For the Smarterm items it will do the same for Smarterm.
OlMonitorLive is a little better than OlMonitorProcess alone, since it can also detect when OlMonitor is running but has frozen.  (In previous versions of OverSeer you needed to have them both enabled to restart OlMonitor).
OlMonitor sends a ‘still alive’ status about every 60-120 seconds, so set the thresholds above 120.
Generally we don’t really want OverSeer to step in too soon on any item, because sometimes OlMonitor may be busy processing a long log.  Smarterm may take a long time to capture a long log, or sometimes the Sunquest server is bogged down during a backup or peak times.  Finally another process on the machine (such as a periodic virus scan) can slow the pc to a crawl and make OlMonitor take a long time.
Send report:  When you are having issues with an Ol Monitor it can be a pain to get on the pc and send the OlProcessLog file.  You can get a report sent when the item exceeds the threshold.  OlMonitor info in the reports is encrypted.
Please note it’s still likely the automatic email report will be blocked by the firewall.  Also you need to check with your IT department before enabling reporting.
There are several security features you can enable to prevent/protect PI in Ol Monitor logs:  Logging and security features

Other item recommendations:

Item: Description: Recommendation:
SmartermProcess Monitors whether the StOffice.exe process is running.  Can restart if Take Action is enabled. Probably redundant: Ol Monitor itself already keeps close tabs on Smarterm and can close and restart it.  If OlMonitor is having trouble launching Smarterm you can try the Alternative ST Launch option.
OlMonitorProcess Monitors the OlMonitor.exe process.  Can restart if Take Action is enabled. Probably redundant:  OlMonitor Live item is usually better.  But if OverSeer is having trouble reading settings info this one is better.
NewCapturedLog Checks the OlMonitor log folder for new file creation periodically. Probably overkill: This is just another option to monitor activity that hasn’t found a good use case yet.
SmartermStatus Updated Checks the active settings location (registry or ini), for status update from Smarterm macro. Could be useful: Ol Monitor keeps tabs on Smarterm already so there’s probably no use in enabling this item.

You can try it out here:
http://www.synapsonic.com/OlMonitorOverSeer/publish.htm

New feature added–Filter Toggle

A user had a great idea for a feature to quickly turn on/off individual filters from the main window.  This might be useful to handle workload during different times of the day or shifts.  This feature is available in versions 1.89k and higher.|

<—The checkmark indicates the filter is active.  Here the filter MDIFF has been disabled.

New HRP options and Order Entry Error Report. OL Monitor version 1.88j.

Adding the OEE HRP report to Ol Monitor caused a cascade of changes to the macro and options window.  The following changes appear in version 1.88j:

  1. Toggle OL log report from Misc tab:

    You can now turn ON/OFF the OL log from the Misc tab.  Previously this was present in both the HRP and PL options, which was a little confusing.
  2. New fields for OEE HRP report:

    The checked fields are available for the OEE report.  The last 4 fields (EP. LOC, REQ#, CLIENT ID, & ORD.DIAG) were added specifically for OEE.  The fields Msg# and Message were already present for the ADT report but not visible.
    The Status field is a default field that defaults to ‘O’.
    The Test field will contain a copy of the Msg #.
    The HID field is the Patient #.
    On the sample report I received, the following fields were listed but no info was present: SPEC ID, UNQ #, CPY PHYS, ORDER LOC, EP ID, & REQ #.  If any of these fields are present on your OEE log they may not show up on OL Monitor since I was not able to test them.  Please contact me if you would like these fields to work and I will fix them.
  3. HRP options menu changed:

    In previous versions there were 3 options at the top of this menu- OL Only, OL and HRP, and HRP Only.  Again this was a little confusing so those were removed.  (To turn off the OL report and use HRP only go to the Misc tab.)  Use the checkboxes to choose which HRP reports to pull.  It is possible to have ‘Use HRP module’ checked but pull no reports if none are selected.  You can pull all 3 HRP reports and even the PL and OL reports together.
    When you click on a report in the list, the corresponding options will be loaded below.  To change the options click Modify.
    *Note: You MUST click Done to save the changes to your options.
    The POD options are only for the ONP report, and will not appear when you click the ADT or OEE reports.
    Report option: Previously it was important to know what numbered option your report menu was in the Sunquest roll-and-scroll menu.  Now the macro will attempt to automatically select the correct number for your selected report.  However as a backup you can input the report option here.
  4. PL menu change:

    The 3 confusing report options (OL only, PL and OL, and PL only) were also removed from the PL menu.
  5. Smarterm macro changes:
    Many changes have been made to the macro that mostly affect only the HRP report.  The macro is automated and you do not have to interact with it.  However if the macro behaves badly after this update please contact me immediately.

HRP module now supports ADT Error Report log

Data from the ADT Error Log Report can be added alongside Ol Log and/or PL log data in any existing OL Monitor installation.  Or ADT error log data only can be displayed.  The error log contains a lot of duplicate messages, these are eliminated.  You can apply filters, sorts, and coloring to the ADT error log data to make seeing significant errors easy. Like the OL and PL log, the data is updated continuously so you will see errors as soon as they happen.
Somebody’s job is about to get a whole lot easier!

Getting started with the HRP ADT log:

First you need to enable the HRP option under the HRP tab, then setup your options.
It is not possible at this time to pull both the ‘Orders not Processed’ and ‘ADT Error Report log’ reports at the same time.

Next you need to make sure the ADT Error log fields are selected on the misc tab.

<– Available fields as they appear in options.

*IF THIS is the first time you have enabled HRP, you may need to click OK then go back into the options so that the HRP fields will be enabled.

These are the available fields for ADT you can display:
Priority
Coll Date (For this I use Admit or Discharge date if it is present.  Otherwise it defaults to the current day, 00:00)
Coll Time (same as Coll Date but it will always be 00:00)
Rec Date – From Date column on report
Rec Time – From Time column on report
Dept – On the one sample ADT log this was either ‘LAB’ or CHNG
Location – from the LOC column
HID  – this will be the Patient Number from report.
Episode type
Episode ID
Test – This is the MSG #- ‘1002’ (just the number portion)
Order Phys: 1st phy
Cpy Phys: 2nd phy
Comments: The entire message line

Field map:


Duplicate messages on the ADT log are automatically filtered out.

You may want to turn OFF your filters to see all the data from the ADT log.

After that cross fingers and give it a spin!

Email archive

UPDATE: Please see the full updated list here: https://us1.campaign-archive.com/home/?u=2b1b01defc2a1b7e3212a7744&id=1d561b4388

If you are new to this list, you may not have gotten these previous emails:
1. Website announcement
2. Jokes 2
3. You know your instrument is a piece of junk when…
4. Macro tutorial online, minor OL Monitor updates
5. Ol Monitor/DragInfo program updates & new feature poll
6. On OL Monitor ‘not working’ with 6.4.
7. OL Monitor Budget n Bugfixes
8. Testers needed for pending log module
9. Pending log module ready
10. Windows 7, HRP, and new field.
11. 2 new Ol Monitor-related programs available, more Windows 7 info, and HRP beta.
12. Ol Monitor HRP ready, CPL labs added, and some new features.

Installing OL Monitor on Windows 7

The installation process should be virtually the same as with Windows XP.  But here is some extended info about Windows 7 installing and help for any potential issues:

1. Download OL Monitor or run install from cd*(Only use CD if it is a recent version, 1.78 or higher).  (Registered users email me for link to download if you need it)
-You should be logged on as an admin user of the pc to install programs.  (Windows 7 will prompt you for admin credentials if you are not)
-You should not need to run the installer in compatibility mode for it to work. (In fact, if you run the installer in compatibility mode it may try to use the wrong folder locations.)
-Make sure Smarterm is installed first.
-When you install Smarterm you should select to use a common location for all users:

2. Run Ol Monitor.  Remember you DO NOT need to set OL Monitor to run in ‘compatibility mode’, just run it:

3. After a few seconds you will be prompted to setup a login password:

4. Click Yes and it will bring up the options.  The login, password, ip address, and other options are the same as with XP and covered in other install instructions on the Download page.  The first video on that page goes through installing.

5. With regards to Windows 7 there are 2 areas of note under the Advanced tab, you shouldn’t have to change anything here:

-The ‘Logfiles path’ has changed from what it was in XP.  It used to be the Smarterm Sessions folder but in Windows 7 all folder locations have been centralized to C:\users\Public\Documents\OlMonitor
Using the Public folder ensures all users and the Smarterm program will be able to access the settings and files in the folder.
-Operating System: You should not have to mess with this setting.  Normally OL Monitor should automatically detect Windows 7 and you will see that button selected.  If you override and set it to Windows XP it will attempt to use the XP folder locations, which are largely inaccessible in Windows 7.

6. If you have your login, password, ip address, device loc, and access code set then you can go ahead and click OK in the options and allow Smarterm to start and attempt to pull a log from Sunquest.
-One site reported that OL Monitor had a problem launching Smarterm.  I have not experienced this myself and don’t have much info.  If OL Monitor seems to freeze after attempting Smarterm launch get in touch with me.
-IT folks:
If you are installing this for a lab and you do not have the login and access code etc, if you can at least set the IP address for the Sunquest server you can go ahead and verify that Ol Monitor can launch Smarterm and let the lab worry about setting the password and stuff.
Alternatively, if you want to keep OL Monitor from trying to launch Smarterm you can enable ‘test mode’ under the Misc tab of options.  Careful!  If you leave test mode on it can be very confusing for the next person trying to figure out why Smarterm won’t start!
-You may have to click Action-Start to get Smarterm to launch the first time (it will eventually launch on it’s own but the wait can be tedious)

-You may see a messagebar message about Smarterm sessions folder not matching up, just ignore it:

7. If Smarterm launches ok and pulls a log then you are all set!  Take a break.
-If you need to restore your old settings from XP see this post.
-95{fd72016040d8cd0556234298fa216115d17f974a3f3ed976037886290d762d66} of the time if there are problems pulling the log, messages about the Smarterm server, and getting old or no patient/log data, it is due to having the wrong password, login, or ip address setting.
-If you have any problems or need help feel free to contact me.

Migrating Ol Monitor from XP to Windows 7

This post is more for people who already have OL Monitor running on Windows XP and want to move it over to Windows 7.  If you are installing Ol Monitor to Windows 7 from scratch nothing here applies.

This post explains all things in detail and assumes you have forgotten everything so it’s pretty long, you may want to print it out first.

So you have been running OL Monitor on XP for years and years, and have invested a fair amount of time getting colors, filters, sorting, and various other tweaks set just right.  But now IT insists that you need to switch to Windows 7.  This tutorial will walk you through the process of backing up your settings, restoring them to Windows 7, and then dealing with any compatibility issues that may arise.

1. Your settings, where are they?

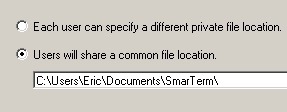
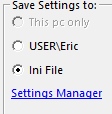
First thing to check is where your settings are stored right now, there are 3 possible locations.  To find out which one from Ol Monitor click options and take note of where the checkmark is:
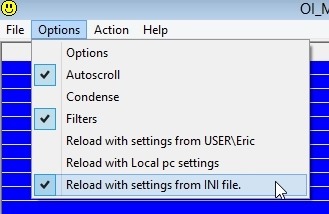
  <— Here we see that the settings are stored in the INI file.

IF your settings are stored in Local pc , this location is NOT available under Windows 7.
IF your settings are stored in one of the other locations you can skip to the next step but make a note of which location is currently selected.

2. Saving your settings to a different location because you had them saved in ‘Local pc’/’This pc only’:

Settings location topic in help manual: http://www.olmonitor.com/ManualM/window_3_6.htm
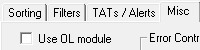
The ‘Local pc’ location is not available under Windows 7. So you can save yourself some trouble later by changing the location now to either USER or INI file.  You cannot change the location by simply clicking one of the locations from this menu, you need to go into the Options window.  Click Options-Options and it will bring you to the Misc tab:
 * ‘This pc only’ means ‘Local pc’
So you can see the ‘This pc only’ button is selected.  To write your settings to another location you need only to select one of the other locations.  When you select the other location you will see this warning:

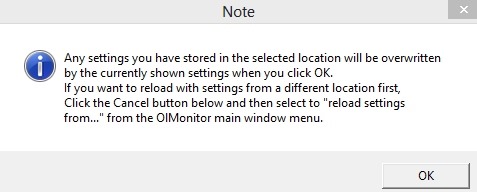
This is ok, we want to write our settings to the new location.  There is one possible exception:
A few labs have 2 groups of settings saved to 2 of the locations, say one for night shift and one for days, night shift in INI file and day shift in USER.  If you have this setup you will need to go in and export your settings for each location separately.
But most likely you do not have alternate settings setup in one of the other locations.
Click OK and you will see the selected button has changed to the other location.  But your settings have not been saved there just yet!  You have to click OK or Apply, when you do, your settings will be saved to the new location.
IF you see any error messages after clicking OK or Apply there may have been some problem writing the settings to the new location.  Try selecting another location and see if you get any errors.
Now make a note of which location you saved your settings to.


3. Backing up your current settings:

There are 2 ways of backing up setting available to you, I suggest you use both to be safe.

Backup method 1: Go into options to the Misc tab:

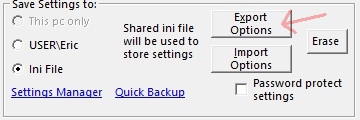
Just click the ‘Export options’ button.  A browse window will come up so you can choose where to store the backup file.

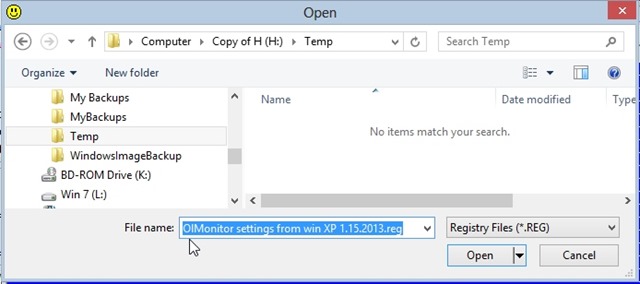
Note:  You need to type in the appropriate file extension for the backup type.  If exporting from USER use the .reg extension. So your filename will be something like:  OlMonitor_Backup.reg
If exporting from INI file put ‘.ini’ as the file extension.
Store the file on a USB drive or a network drive since IT will be re-imaging the pc or giving you a brand new one.  It just needs to be somewhere that you will be able to access from the new pc later.

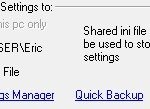
Backup method 2a: Quick backup
Go into options and under the Misc tab, click the blue “Quick Backup” link:
<– All settings will be saved in a dated folder on the pc desktop.

Backup method 2b: Using Ol Monitor Settings Manager
If you have Ol Monitor version 1.80 or above:  Simply click the blue link that says ‘Settings Manager’:

If you do not have OL Monitor version 1.80 or higher you will need to install the Settings Manager.  Do this now and when done run the Settings Manager program and return to this tutorial.  How to install Settings Manager.

Having Settings Manager loaded:

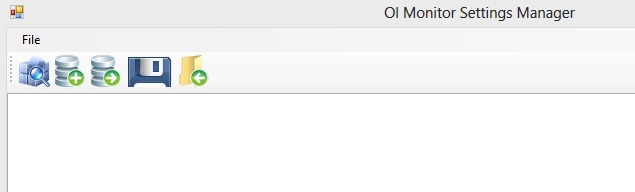
1. Click the cube-magnifying-glass icon.  All your current settings will be loaded up, each location in a different tab:

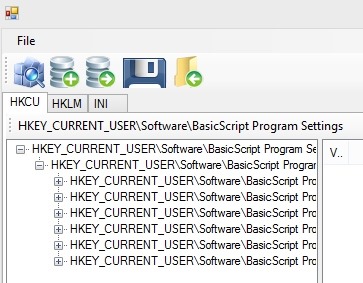
2. Click the Green-arrow-folder icon.  A new tab named ‘Backup to folder’ appears.  Select this tab:

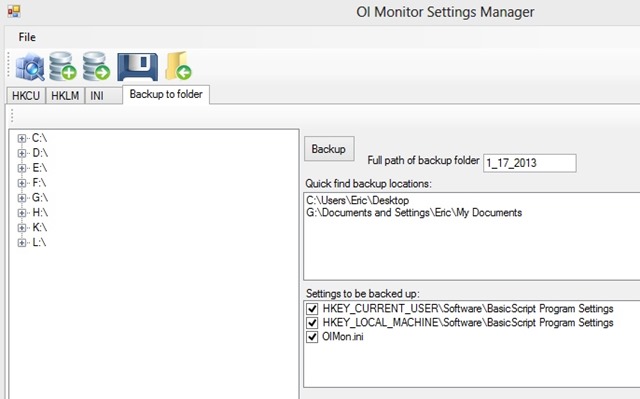
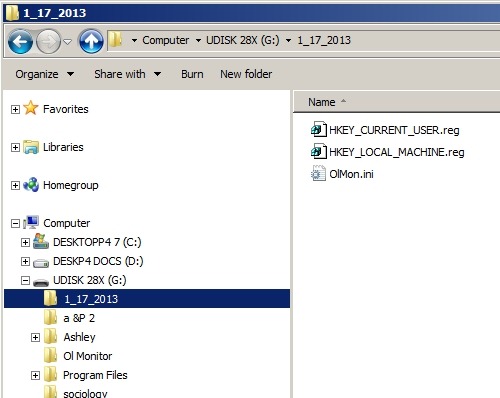
To the left is the list of drives on the system, you can browse to your USB drive or network folder.

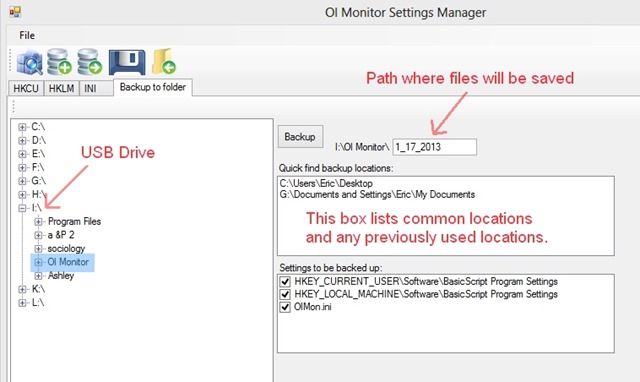
Here you can see I previously made a folder on the USB drive named OL Monitor.  You can also just select the root of the drive.
You will see that the date (1_17_2013) is used as a folder name, you can choose your own folder name but the name cannot be blank.

3. Click the ‘Backup’ button and all settings locations will be saved to separate backup files:
Unlike what happens when you click the ‘Export options’ button in OL Monitor, all locations get backed up not just the current one.

So now you have your precious settings backed up and after the upgrade to Windows 7 you can move on to:

Part II: Restoring your backed up settings to your new Windows 7 installation:

1. If you have not already, install OL Monitor on Windows 7.

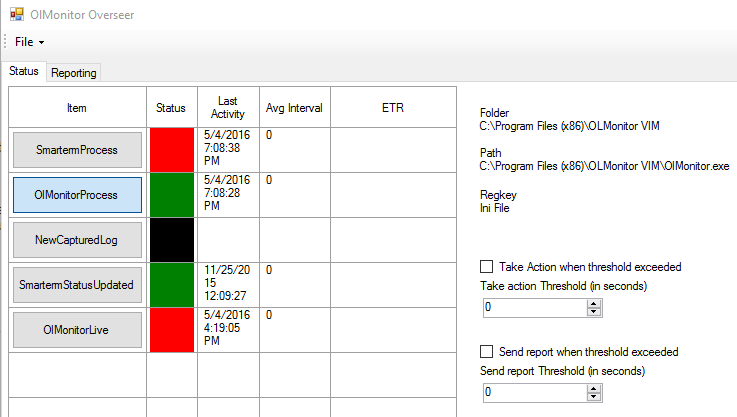
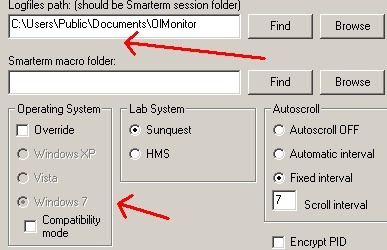
2. After you install OL Monitor you will have the default settings.  As you can see the ‘Logfiles path’ is in the public users’ folder:

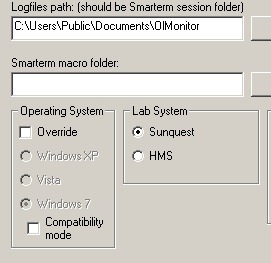
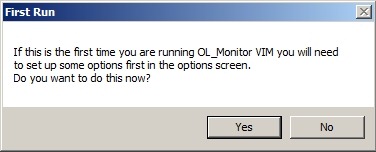
3. Ol Monitor will tell you that you need to input the login and password etc, but we don’t need to worry about that we saved them in our backup!

4. Restoring from your backup:

1. Close OL Monitor for now.
2. Locate your backup(s) you made on the USB key or network location using Windows Explorer.

3. This is why it was important to take a note of which settings location was selected back when you were backing up.

4. 2 ways to restore settings:  You can double-click on .reg files, for .ini files you cannot.

Restoring from a .reg file in Windows 7

As of this writing (Ol Monitor version 1.81), the Import function does not work for .reg files in Windows 7 (likely due to some security feature).
If you try to import a .reg file from within Ol Monitor you will get this error:

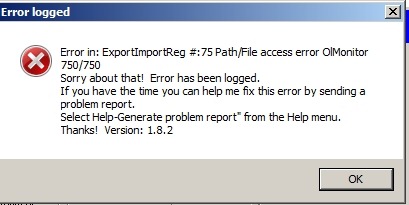
 “Error in: ExportImportReg #:75 Path/File access error OlMonitor 750/750”

The workaround is to simply double-click the backup file in Windows Explorer.

Restoring from an .ini file in Windows 7

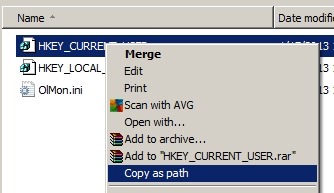
Before you start it up here’s a quick tip:
Hold down the shift key as you Right-click on the file, in the drop down you will see ‘copy as path’:

Ok now start OL Monitor and go to the Options window.  Make sure that you have selected ‘Ini File’ first.  Click on ‘Import Options’:

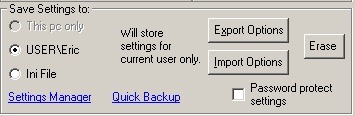
In the dialog that pops up either browse for the file or paste its path into the File Name field:

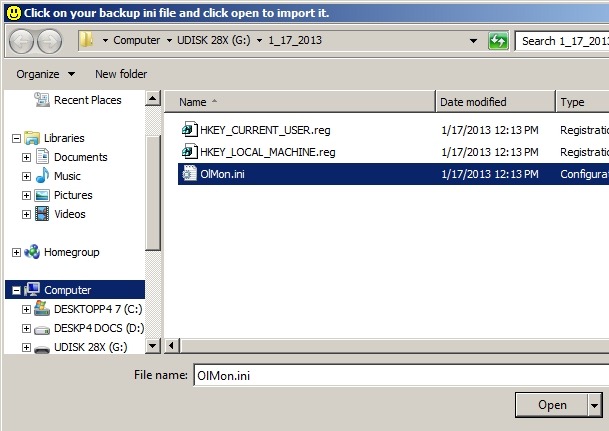
*If you are only seeing .reg files and not .ini files in this dialog, close it out, make sure Ini file is selected as the backup location, click OK and close and restart Ol Monitor.

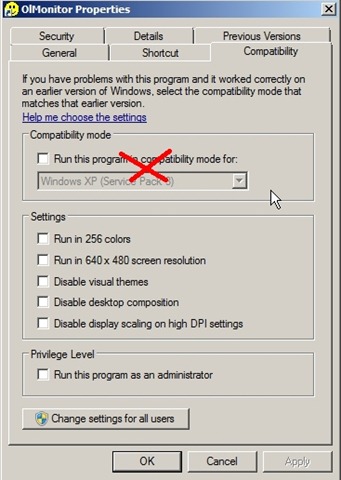
Getting the settings imported was the hard part, but there are still some things to check.
In our backup file, the file locations were set like this:

Here’s where we can get into trouble, we imported the settings and they wrote over the default file paths.  Let’s pull up the advanced tab and see if OL Monitor was smart enough to figure this out:

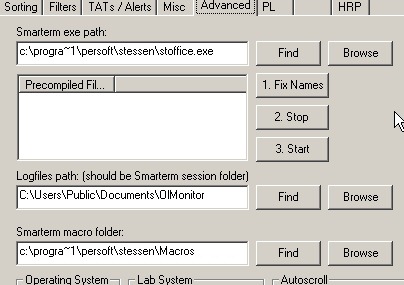
Well it got the logfiles path right, but macro folder and Smarterm exe are wrong.
The exe on my machine should be: C:\Program Files\Esker\SmarTerm\stoffice.exe
The macro folder should have been: C:\Users\Eric\Documents\SmarTerm\Macros

Don’t worry about the stoffice.exe location: OL Monitor will automatically search and locate the exe file on the first run.  You will see this:

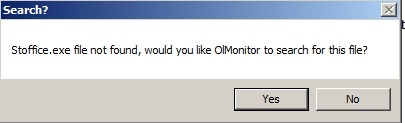
Ol Monitor quickly locates the exe file and fixes the path.

What about the Macro Folder path? Actually, OL Monitor doesn’t really need to know this, it’s to avoid a rare error that comes up when someone has deleted their default macro file. Ol Monitor already has an alternate method of clearing this error, so it’s really, really not important.
If you want to correct it you can paste in the path for the Smarterm\Macros folder.  At this writing (ol monitor v1.81), the find button finds the wrong folder, and the browse option is a little confusing.

That’s it! You’re done.  If you run into any issues be sure and contact me so I can update this post for others.

Windows 7 Compatibility

With version 1.77 Ol Monitor is now Windows 7 compatible. To be compatible with Windows 7, the locations of various files (ini file, captured logfiles, error log, and session file) had to be changed. Since changing these locations on existing XP installations might cause problems, Ol Monitor detects the OS and works the same as always if it’s on XP. So you can continue to update your current XP installations without worry. Regarding running OL Monitor in Windows 7: *(In Windows 7 you can enable ‘compatibility mode’ option that tricks a program into thinking it is running in XP. So in Ol Monitor there is an option to override the OS detection in advanced settings. It only seemed fair to give the program an option to know the truth. Actually this was left in for troubleshooting purposes only, I do not recommend overriding OS detection otherwise.)

Running Ol Monitor in Windows 7:


This is redundant, but here is the link to email about Win 7 compatibility: http://us1.campaign-archive1.com/?u=2b1b01defc2a1b7e3212a7744&id=1d0b83e2a2

Ol Monitor Settings Manager

Managing your settings can get a little confusing.  Also, it’s very rare, but sometimes if your settings get corrupted Ol Monitor will not even load. To make things easier I have created a program specifically to manage Ol Monitor settings.
OL Monitor Settings Manager is designed to accomplish the following:

  • Easily locate and load all existing settings
  • Easy 2-click backup of all settings.
  • Load and examine any backed-up settings
  • Transfer settings from one location to the other, or restore settings from a backup

Installing the program is also easier, utilizing ClickOnce deployment.

Install OL Monitor Settings Manager
.

Also, now in OL Monitor versions 1.80 and above, there are 2 new links under the Misc settings tab:

Click on ‘Settings Manager’ to launch OL Monitor Settings Manager.
Clicking on ‘Quick Backup’ will launch OL Monitor Settings Manager with the command line argument ‘backall’.  This instantly backs up all current settings to a folder on the desktop or in my documents with the current date as the folder name.

Finding lost settings / copy settings to new pc:

There are 3 locations where settings can be stored.
-If you are missing settings, you can cycle through these 3 locations looking for your settings.
-If you just need to copy your current settings over to the new pc, you can do that also

First you need to try and locate the settings.
Run OL Monitor and click Options-Options from the drop-down menu.
NO settings found: The settings appear blank like this, with a couple of asterisks in the login fields:

Settings FOUND:  Access code and login are not asterisks (password will always be asterisks):

If you found your settings you can skip the next step:

Cycling through the other locations:
Start Ol Monitor.
Click on options, and look at the ‘Reload with…’ options:
<— The checkmark indicates which location it was using.
Wherever the checkmark is, select one of the other locations.  Ol Monitor will close and you have to restart it.
Look again for your options, if not found, try the last location.

If you found your settings:
You can export them to a file and restore them to the new pc.
Here are instructions on exporting the settings to a reg / ini file:
http://www.olmonitor.com/ManualM/window_3_6.htm

You can then import the reg file to the new pc.

There are extended instuctions on working with the registry manually here:
http://www.olmonitor.com/settings.html
Recommended if you have worked with the registry editor before.

I am working on another program whose purpose is to make managing Ol Monitor settings easier.  It is almost done, if you would like to try it I can provide you with a link to download it, but at this point it is a little rough around the edges.